Showing posts with label Chillies. Show all posts

Friday, July 21, 2017

Ginger Beer

This year I have been experimenting with ginger beer production. Ginger beer is one of my favourite alcoholic drinks. I don't drink lager or beer, or even much wine. I have therefore tried many of the ginger beers on the market.
  • Crabbies is maybe the most popular in the UK and is a good alternative to home-brew. They have many flavours, but the traditional one is the best I think. Even so, there are some good, lesser known brands on the market worth seeking out. Most supermarkets sell Crabbies. If you can get it, try the special reserve Crabbies Black.
  • Ginger Grouse is a ginger beer made by the whiskey makers, Famous Grouse. It has a great flavour as they put a shot of grouse whiskey in it. I think probably less than a shot, but it does make for a very nice, if slightly sweet, ginger beer. Sainburys and Morrisons sell it usually.
  • Hawkes are a small London based brewery with a growing reputation. It can be harder to get hold of, but it is really worth the trouble. Hawkes started with their ginger beer and make cider now too. But their ginger beer is my number one favourite on the market at this time.
  • Wychwood produce a GingerBeard variety which is ok. It is more beery than most, although still quite sweet. I was not a big fan to be honest and only tried it once. Their website is brilliant though and Hobgoblin is great to use to cook venison and beef with.
Some more reviews of a wider variety here and here

But commercially sold ginger beer is not cheap at usually £3.50 for a 500cl bottle, and over a fiver in a pub. As usual, it is cheaper to make your own, and it is a lot of fun to do so. 

This is how you can make your own superb ginger beer and you get 7 litres for less than £10. Here is what you will need... but note that this takes time, about three weeks in total. And it is best to make it when it is warm (at least 15c), as it is much happier and develops better in warm weather.

A big chunk of ginger, unpeeled, but grated roughly.
The juice of 2 lemons.
A chilli pepper of your own choice. I use a Bulgarian carrot chilli, but choose one that suits your taste. Try half with your first batch and work up from there. Chop it nice and fine.
A 2 kg bag of granulated sugar. I use about 1.5kg of it. If you use all 2kg it will be very alchoholic or sweet, depending when you start to drink it (see details below). Its up to you. I did warn you.
A 7g sachet of champagne yeast. Easy to buy on eBay or a local hardware shop that sells wine-making kits. Don't use bread yeast or even wine yeast; they will work but not anywhere near as well.
5 x 2 litre plastic bottles with screw tops. Ones that have had fizzy pop/soda in them. Clean them out and rip the labels off. Do not use glass bottles. 
A big glass jar like the one in the picture here.

Stage One
The first thing to do is take the sachet of yeast and put it in the jar. Then add about a mug and a half of warm, but previously boiled water to the yeast to get it going. Stir in well and it will start to froth a little bit. If the water is too cold it will not come alive, too hot it will die. So be careful. Body temperature is about right. Add a big tablespoon of sugar and stir until it has dissolved. Leave it for about half an hour. Then add the grated ginger, the lemon juice and the chilli. Give it all a good stir. Cover the jar with a dry tea towel, held on with an elastic band. Leave it somewhere warm for a day.

Next day, take the towel off. Give it another big tablespoon of sugar, stir until dissolved, replace the towel and elastic. It should look like the picture here. Repeat this for about 7 to 10 days. By then you should have a good frothy ginger beer plant! This is a live organism, feeding on the heat and the sugar. Feel free to name it if you wish. 

Stage Two
Get a big saucepan that can take 5 or 6 litres of water. Fill a couple of inches from the top; I aim for about 6 litres in my 7 litre pan. Bring the water to a gentle simmer and then add as much sugar as you want. I use 1.5kg for a strong, but not super strong beer. Stir in until the water is clear as this shows the sugar has completely dissolved. Now let it cool.

Once cooled down to room temperature, use a funnel to fill your plastic bottles with about 1.5 litres each of the sugar solution. Strain the ginger beer plant through some muslin draped over a steel strainer. Feel free to squeeze the last drop out of the ginger mush using your hands (clean hands, people!).

Divide the ginger beer plant solution across the bottles evenly, using the funnel. Take your time and made sure it is as even as you can make it. This is not an exact science, so don't worry too much. Screw the tops tight on each bottle and put somewhere warm and safe.

Safe? First time I made this, two of the bottles exploded. This is volatile stuff and you do need to be careful. The warmer it is, the faster the yeast will eat away at that sugar and create natural carbonation, and the more pressure on those plastic bottles. I recommend releasing some of the carbonation every day, to be safe. If you miss a day or two, it will be ok probably, but leave it a week and those bottles will let you know about it. I now put my bottles in an old clean plastic dustbin with the lid on, and have it outside, just to be safe. Of course, this means I can only make it when the weather is warm, but my long-suffering wife does not want to have to wash sugary ginger beer off the ceiling again and I cannot blame her!

Stage Three
So you have done all the hard work. You have been gently releasing some of the gas from the bottles every day or two. After at least a week, you can try the beer. Taste it and see what you think. If it is ok, drink up! If it is too sweet (which is likely this early), then leave it a couple of days and try it again. The yeast will keep eating that sugar, making a less sweet but more alcoholic drink. Once it is right for you, put it in the fridge so that the yeast stops eating the sugar (or at least it slows down dramatically) and you can drink it! You should try to finish it within a month, as this is naturally carbonated and therefore will go flat over time. 

Best to drink it cold and note it is normal to find there will be a little sediment in the bottom of the bottles; this won't hurt you, but you can pour away the final inch if you prefer, like me, not to drink it.

Monday, July 25, 2016

Smoking

Some time ago I built myself a cold smoker out of old wooden pallets. I had a number of aims in building this smoker.
  • It had to be big enough that I could get a whole (at least partially butchered) deer in it.
  • It had to be pracical enough to be used for small items too, like trout and even for chillies.
  • It had to be a COLD smoker; I didn't want a hot smoker. 
  • I wanted the smoke to some from a real source; actual smoke from an actual fire, not that fke smoke-in-a-can stuff.
  • I wanted to have the flexibility to be able to make smoke from a variety of things; like wood chippings, shavings, dried herbs, whatever.
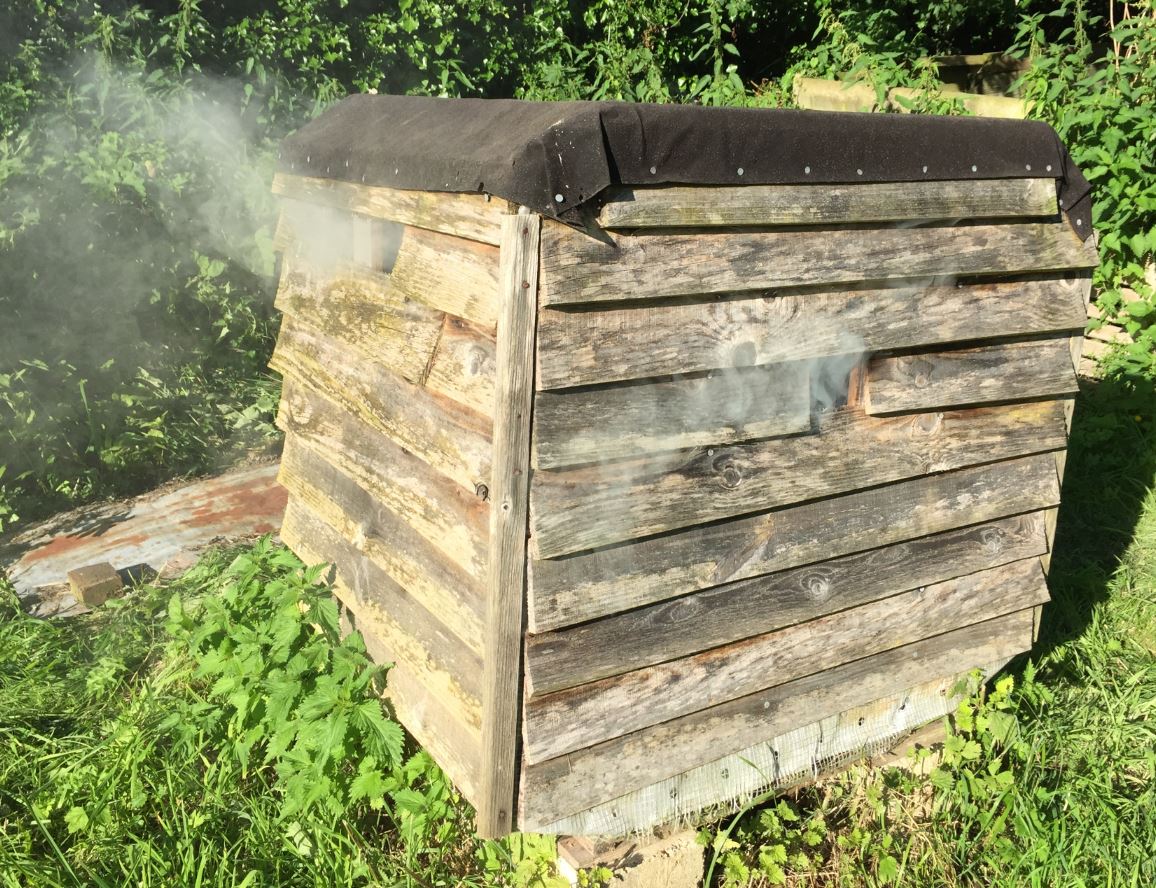
It went ok. The smoker I ended up with is about a metre cubed, so I have lots of room. It is water proof, but had a few holes from which the smoke can escape; it is important that you don't have stale smoke, you want it to be constantly flowing through the smoker and whatever you are smoking. Here is a picture of the smoker I ended up with. You can see there is an inner lining; I thought this would be useful to keep some of the smoke in, but ended up ripping most of it out as you will want the smoke to escape. Other than that, the design worked really well.


I dug a fire pit and lined it with bricks. I used terracotta piping to feed the smoke from the brick lined fire pit to the smoker, a few feet away, raised on blocks. My method was to get a good fire going and let it burn until you have some good sized coals smouldering away nicely. 

Then cover these with your wood shavings/chippings/dried herbs or whatever, and cover the pit with a good cover; I found a sheet of corragated iron worked really well. When covered, the smoke gets drawn through into the smoker and out the holes at the top of the sides. 

There are three main things that I have smoked that I have had real success with.

Trout - If you like smoked salmon, you are highly likely to think smoked trout is just as good, if not better. I am lucky enough that my father loves to fish for trout and so I end up with a nice bag full of trout every now and then. Usually, these are cured and then smoked. 

The cure I use is 1kg salt, coarse if possible, with a big handful of soft brown sugar. Then you can add any herbs you like; I like to throw in some fennel, lemon wedges, parsley, peppercorns, celery leaves, anything like that is good. Give it a really good mix together. Pack your trout fillets into the box in layers covered in the cure, then put into the fridge. After a couple of days take them out and turn them over, and pack them back in for another couple of days. The cure will pull out moisture from the fish and penetrate it with those flavours too.
Then wash the fillets off with water and line them on grills ready for the smoker, skin side up as shown above. Smoke them with something like oak chips or shavings if you can. Give them a good steady smoking for five or six hours. Make sure the smoke is cool and not hot; trout will hot smoke easily and that is not what we are going for here. Then, remove and slice and enjoy. Fillets can be frozen and taste just as good after defrosting, so worth doing a big batch if you have the fish available.

Venison - Living in the New Forest, venison is pretty common. I made friends with someone local who shoots deer and so I have a good source of fresh venison which I can butcher and cook any way I like. A very good use for an abundance of venison is to cure and smoke a haunch. Imagine a Parma ham, but made from a haunch of venison. It is much easier than you might think too. (You can see below I have most of the deer in the smoker - don't forget the liver too - smoked venison liver is superb!)


Take your haunch of venison, on the bone, and make sure is it stripped of fur, unwanted fat and sinew. I would then smoke it for about 6 hours at least (as shown above - on a grill so the smoke can get to the meat), using oak and whatever dried herbs I can get hold of. Then it's time to cure it. Prepare a brine for your curing; for venison I would generally take a plastic (food quality) box (make sure it fits in your fridge), put in one kilogram of salt, a bottle of red wine (good stuff, not cheap), stir together well. 

Then you can add all manner of herbs and things to flavour the cure. I might add pepper corns, juniper berries, slices of lemon, lime or orange, herbs like rosemary, sage, parsley, bay, thyme, mint, anything you like. Stir this in well. It will look a mess, but it's ok. Put the haunch, still on the bone, into the wine-brine cure. Use a metal spoon to spoon the cure over the haunch; make sure it gets into all the nooks and cranies. Then put it in the fridge, covered. 
Every morning and every night you will need to pull it out, turn over the haunch and spoon the salty cure over the meat. Repeat this for at least 3 days for a small haunch and 5 days for a big one. Then pull the haunch out and it is time to clean it and air dry it. 
This is easy - just wrap it in muslin (so the flies cannot get to it) and hang it outside, in the shade, for at least 10 days. Then pull it down, unwrap it and clean/scrub it gently with cider vinegar to kill any mould that might have formed (this is normal). 
Then run it under the cold tap, let it dry, and then slice it into very thin slithers to taste.

Chillies - Chipotle chillies are smoked hot chillies; traditionally a Jalapeno chilli, but you can smoke any type you like and I tend to smoke slightly hotter chillies like a Ring of Fire chilli. My method differs from the traditional, on the basis that I don't live in a hot climate and therefore some of the preperation needs some technological aid. I grow my chillies and pick them when very ripe. Then I will use a dyhydrator (similar to this one) to partially dyhydrate the chilli - don't completely dry it out or it will struggle to soak up those smokey fumes. Then I smoke them for at least 5 hours; 8 hours is best. 
When they are done, I like to take some of them in this state and use them partially dehydrated; they dont keep so long, but the smoking will dehydrate them a little more than they are already and they work great chopped into stews and chilli (of course!). 
The rest I will then dehydrate more so they are almost completely dry, but not quite brittle. In this state they will last for at least a year in a sealed jar, keeping that great smokey taste.   


Sunday, June 19, 2016

Growing Chillies

There is something great about growing chillies. There is such variety in size, flavour, colour, strength and shape. They are challenging to grow well too. I usually end up growing far too many and end up giving away lots of plants and lots of chillies too when they come through. 

I won't give too many tips here on how to succeed on growing them... there are far better people than me to give those tips, like my good friend Andrew Brooks at Gower Chillies who also runs a damn fine Chilli Festival each year - this photo is of me helping out at the first festival he ran in 2013.

There is a lot of information about chillies on the web. I like this Periodic table of chillies - you can click on each chilli for more information. There is some more good information on growing here , and here from Sarah Raven. And this site shows a great list of chillies, scoville scale, description and pictures; it's a really good resource.

I shall tell you about my favourite chillies though. 
  • Padron - (about 2,000 scovilles) best to pick green and to fry whole in olive oil, then sprinkle with sea salt. These are the ones that are supposed to be mild, but one in ten is hot. 
  • Cherry bombs - about the same heat as the Padron, maybe a bit more, but have a great round shape.
  • Jalapeno - this well known chilli is great for pickling.
  • Bulgarian Carrot - unusual orange chilli, great taste and about 30,000 on the scoville scale.
  • Ring Of Fire - grows fast, produces lots of long red chillies, but is great picked green too.
  • Lemon Drop - I found a bit tricky to grow, but the citrus flavour is worth the effort.
  • Cayenne - very easy to grow, widely available and pretty hot. A good hot starter chilli.
  • Thai Dragon - produces lots of hot small chillies on a compact bushy plant.
  • Hot Wax are easy to grow, fruit abundantly and produce big fat chillies. Not too hot, either.
  • Golden Habanero - very hot, lovely lantern shape. Needs a lot of constant heat to grow well; the usual rule is that chillies are harder to grow and need more heat, the hotter the eventual chilli should be.
  • Chocolate Habanero - I managed to grow one of these and they were lovely, brown, smokey chillies. VERY hot, great once it got going. 
I grow my chillies in my greenhouse. I also germinate them in the greenhouse; this means I get them through later than if you start them earlier indoors in heated propogation units, but it is less trouble. Then they stay in the greenhouse the whole time in their 8 inch pots, which seems big enough for a single season plant, and they are fed with tomato feed once they start to fruit.

Remember that most chillies are not H1 hybrids, they are 'true', which means you can buy a chilli to eat and if you like it you can collect the seeds from inside it and grow your own from those seeds. Just dry them out and keep them in a cool dark place until you want to try germinating them. Free plants! You can do this with most tomatoes too, although many more tomatoes are H1 hybrids, so the tomato you get on the plant may not be that same as the one you bought... but it usually works.